
This post covers basic information on what is cache, what distributed cache is, how to implement it in the Spring Boot application, what is Hazelcast, and using Hazelcast as distributed cache manager in the Spring Boot application.
GitLab repository: https://gitlab.luminumict.hr/luminum/education/hazelcast-demo
Caching Overview
What is Caching?
Caching is the process of storing copies of files in a cache, or temporary storage location so that they can be accessed more quickly. Technically, a cache is any temporary storage location for copies of files or data, but the term is often used in reference to Internet technologies.
What are Cache Algorithms?
Cache Algorithms provide instructions for how the cache should be maintained. Some examples of cache algorithms include:
- Least Frequently Used (LFU) is a type of cache algorithm used to manage memory within a computer. The standard characteristics of this method involve the system keeping track of the number of times a block is referenced in memory. When the cache is full and requires more room the system will purge the item with the lowest reference frequency.
- Least Recently Used (LRU) discards the least recently used items first. This algorithm requires keeping track of what was used and when which is expensive if one wants to make sure the algorithm always discards the least recently used item.
- Most Recently Used (MRU) discards the most recently used items first.
Distributed Cache Overview
What is a Distributed Cache?
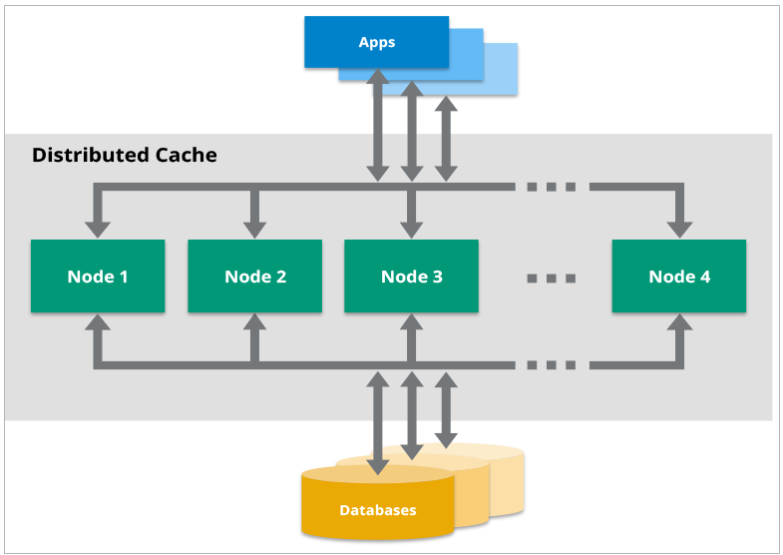
A distributed cache is a system that pools together the random-access memory (RAM) of multiple networked computers into a single in-memory data store used as a data cache to provide fast access to data.
Distributed caches are especially useful in environments with high data volume and load. The distributed architecture allows incremental expansion/scaling by adding more computers to the cluster, allowing the cache to grow in step with the data growth.
What are popular Use Cases for a Distributed Cache?
There are many use cases for which an application developer may include a distributed cache as part of their architecture. These include:
- Application acceleration
- Storing web session data
- Decreasing network usage/cost
- Reducing the impact of interruptions
- Extreme scaling
For more information about the topic see: https://hazelcast.com/glossary/distributed-cache/
Spring Boot Caching
Spring Framework provides caching in a Spring Application, transparently. In Spring, the cache abstraction is a mechanism that allows consistent use of various caching methods with minimal impact on the code.
Cache Abstraction
The cache abstraction mechanism applies to Java methods. The main objective of using cache abstraction is to reduce the number of execution based on the information present in the cache.
Every time a method invokes, the abstraction applies a cache behavior to the method. It checks whether or not the method has already been executed for the given argument.
- if yes, the cached result is returned without executing the actual method
- if no, the method executes, and the result is cached and returned to the user.
The developers take care of two things while working with cache abstractions.
- Cache Declaration: It identifies the methods that need to be cached.
- Cache Configuration: The backing cache where the data is stored and read from
Spring Boot Cache Annotations
@EnableCaching
It is a class-level annotation. We can enable caching in the Spring Boot application using the annotation @EnableCaching. It is defined in org.springframework.cache.annotation package. It is used together with the @Configuration class.
The auto-configuration enables caching and setup of a CacheManager, if there is no defined instance of CacheManager. It scans for a specific provider, and when it does not find one, it creates an in-memory cache using concurrent HashMap.
Example
In the following example, the @EnableCaching annotation enables the caching mechanism.
@SpringBootApplication
@EnableCaching
public class SpringBootCachingApplication {
  public static void main(String[] args) {
   SpringApplication.run(SpringBootCachingApplication.class, args);
  }
}
@CacheConfig
It is a class-level annotation that provides a common cache-related setting. It tells the Spring where to store the cache for the class. When we annotate a class with the annotation, it provides a set of default settings for any cache operation defined in that class. Using the annotation, we don’t need to declare things multiple times.
Example
In the following example, the employee is the name of the cache.
@CacheConfig(cacheNames={"employee"})
public class UserService {
 // some code
}
@Caching
It is used when we need both annotations @CachePut or @CacheEvict at the same time on the same method. In other words, it is used when we want to use multiple annotations of the same type.
But Java does not allow multiple annotations of the same type to be declared for a given method. To avoid this problem, we use @Caching annotation.
Example
In the following example, we have used the annotation @Caching and grouped all the @CacheEvict annotations.
@Caching(evict = {@CacheEvict("phone_number"), @CacheEvict(value="directory", key="#employee.id") })
public String get address(Employee employee) {
 // some code
}
@Cacheable
It is a method-level annotation, it defines a cache for a method’s return value. The Spring Framework manages the request and response of the method to the cache that is specified in the annotation attribute. The @Cacheable annotation contains more options. For example, we can provide a cache name by using the value or cacheNames attribute.
We can also specify the key attribute of the annotation that uniquely identifies each entry in the cache. If we do not specify the key, Spring uses the default mechanism to create the key.
Example
In the following example, we have created the return value of the method emplyeeInfo()in cacheEmployeeInfo, and it is the unique key that identifies each entry in the cache.
@Cacheable(value="cacheEmployeeInfo", key="#id")
public List employeeInfo() {
  // some code
  return employeeDetails;
}
We can also apply a condition in the annotation by using the condition attribute. When we apply the condition in the annotation, it is called conditional caching.
For example, the following method will be cached if the argument name has a length shorter than 20.
@Cacheable(value="employee", condition="#name.length<20")
public Employee findEmployee(String name) {
 // some code
}
@CacheEvict
It is a method-level annotation. It is used when we want to remove stale or unused data from the cache. It requires one or more multiple caches that are affected by the action. We can also specify a key or condition into it. If we want wide cache eviction, the @CacheEvict annotation provides a parameter called allEntries. It evicts all entries rather than one entry based on the key.
One important point about @CacheEvict annotation is that it can be used with void methods because the method acts as a trigger. It avoids return values. On the other hand, the annotation @Cacheable requires a return value that adds/updates data in the cache. We can use @CacheEvict annotation in the following ways:
Evict the whole cache:
@CacheEvict(allEntries=true)

Evict an entry by key:@CacheEvict(key="#employee.name")Example
The following annotated method evicts all the data from the cache cacheEmployeeInfo
@CacheEvict(value="cacheEmployeeInfo", allEntries=true) //removing all entries from the cache
public String getName(Employee employee) {
 // some code
}
@CachePut
It is a method-level annotation. It is used when we want to update the cache without interfering with the method execution. It means the method will always execute, and its result will be placed into the cache. It supports the attributes of @Cacheable annotation.
A point to be noticed is that the annotations @Cacheable and @CachePut are not the same because they have different behavior. There is a slight difference between @Cacheable and @CachePut annotations in that the @Cacheable annotation skips the method execution while the @CachePut annotation runs the method and put the result into the cache.
Example
The following method will update the cache itself.
@CachePut(cacheNames="employee", key="#id")
public Employee updateEmployee(Long id, EmployeeData data){
 //some code
}
Hazelcast
What is Hazelcast IMDG?
Hazelcast IMDG or Hazelcast is an open-source distributed in-memory object store supporting a wide variety of data structures.
We can use Hazelcast to store your data in RAM, spread and replicate it across your cluster of machines, and perform computations on it. Replication gives you the resilience to the failures of cluster members.
Hazelcast is highly scalable and available. Distributed applications can use it for distributed caching, synchronization, clustering, processing, pub/sub messaging, etc.
Hazelcast is designed to be lightweight and easy to use. Since it is delivered as a compact library (JAR) and has no external dependencies other than Java, it easily plugs into the software solution. It provides distributed data structures and computing utilities.
It is designed to scale up to hundreds of members and clients. When we add new members, they automatically discover the cluster and linearly increase both the memory and processing capacity. The members maintain a TCP connection with each other and all communication is performed through this layer. Each cluster member is configured to be the same in terms of functionality.
When to use Hazelcast?
Hazelcast has a vibrant open-source community enabling it to be continuously developed.
Hazelcast is a fit when we need:
- analytic applications requiring big data processing by partitioning the data
- to retain frequently accessed data in the grid
- a cache, particularly an open-source JCache provider with elastic distributed scalability
- a primary data store for applications with utmost performance, scalability, and low-latency requirements
- an in-memory NoSQL Key-Value Store
- publish/subscribe communication at the highest speed and scalability between applications
- applications that need to scale elastically in distributed and cloud environments
- a highly available distributed cache for applications
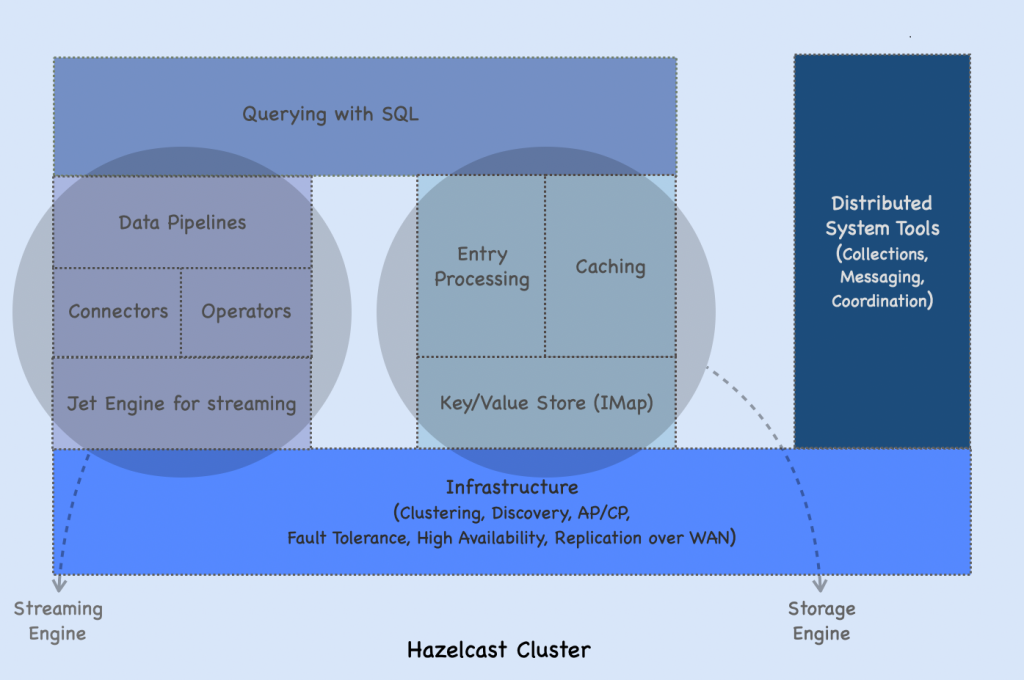
Hazelcast Architecture
In Hazelcast, data is load-balanced in memory across a cluster. This cluster is a network of members each of which runs Hazelcast. A cluster of Hazelcast members share both the data storage and computational load which can dynamically scale up and down. When we add new members to the cluster, both the data and computations are automatically rebalanced across the cluster.
Fault Tolerance
Hazelcast distributes storage data, computational data, and backups among all cluster members. This way, if a member is lost, Hazelcast can restore the data from these backups, providing continuous availability.
Backups are distributed and stored in memory (RAM). The distribution happens on the partition level, where the primary data and its backups are stored in the partitions.
When a member in a cluster is lost, Hazelcast redistributes the backups to the remaining members so that every partition has a backup. This makes Hazelacst resilient to data loss. The number of backups is configurable. Based on the configuration, data can be kept in multiple replicas of a partition.
High Availability
Cluster members monitor the health of each other. When a cluster becomes inaccessible due to an event such as a network failure, other members cooperatively diagnose the state and immediately take over the responsibility of the failed member. To determine if a member is unreachable or crashed, Hazelcast provides built-in failure detectors.
For more information about architecture, please see: https://docs.hazelcast.com/hazelcast/5.2/architecture/architecture
Topology
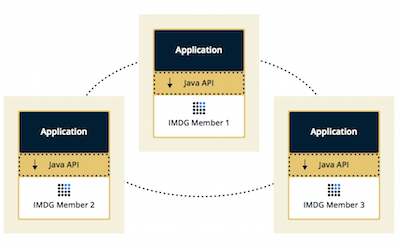
We can deploy a Hazelcast cluster in two ways: Embedded or Client/Server.
If we have an application whose main focal point is asynchronous or high-performance computing and lots of task executions, then Embedded deployment is the preferred way. In Embedded deployment, members include both application and Hazelcast data and services. The advantage of the Embedded deployment has low-latency data access.
In the Client/Server deployment, Hazelcast data and services are centralized in one or more server members and they are accessed by the application through clients. You can have a cluster of server members that can be independently created and scaled. Clients communicate with these members to reach Hazelcast data and services on them.
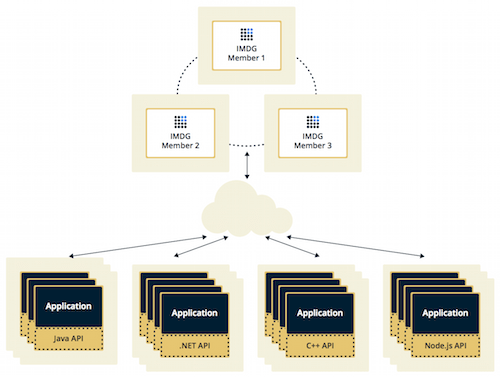
Client/Server deployment has advantages including more predictable and reliable Hazelcast performance, easier identification of problem causes, and, most importantly, better scalability. When scaling in this deployment type, add more Hazelcast server members.
Caching with Spring Boot and Hazelcast
Spring Boot Application
To use caching in the Spring Boot Application, we need to:
- add org.springframework.boot:spring-boot-starter-cache dependency
- add @EnableCaching annotation to your main class
- add @Cacheable annotation to every method you want to cache
In this example, let’s have a simple web service with two classes defined as follows:
@Service
public class BookService {
  @Cacheable("books")
  public String getBookNameByIsbn(String isbn) {
    return findBookInSlowSource(isbn);
  }

  private String findBookInSlowSource(String isbn) {
   //some long processing
    try {
      Thread.sleep(3000);
    } catch (InterruptedException e) {
      e.printStackTrace();
    }
    return "Sample Book Name";
  }
}
@RestController
@RequestMapping("/books")
public class BookController {
@Autowired
private BookService bookService;
@GetMapping("/{isbn})
public String getBookNameByIsbn(@PathVariable("isbn) String isbn) {
return bookService.getBookNameByIsbn(isbn);
}
}If we started the application, then every call to the endpoint /books/<ISBN> would go to the method findBookNameByIsbn() which in turn would first check the cache. If it doesn’t find value in the cache, the method findBookNameByIsbn() would be executed.
Using Hazelcast as Cache Manager
To use Hazelcast as caching manager, we need to add Hazelcast to the classpath.
<!-- pom.xml -->
<dependency>
  <groupId>com.hazelcast</groupId>
  <artifactId>hazelcast-all</artifactId>
  <version>4.2.5</version>
</dependency>
Then, we need to add Hazelcast configuration in one of the following manners:
- Add hazelcast.yaml configuration OR
- Add hazelcast.xml configuration OR
- Define @Bean with Hazelcast configuration in the source code
hazelcast.yaml and hazelcast.xml
These configuration files are called Declarative Configuration and need to be stored in the src/main/resources and Spring Boot automatically sets Hazelcast as a Cache Manager.
# hazelcast.yaml
hazelcast:
  network:
    join:
      multicast:
        enabled: true
No more configuration is needed, Hazelcast is already used as the cache manager in this project.
hazelcast.xml complete list of properties: https://github.com/hazelcast/hazelcast/blob/master/hazelcast/src/main/resources/hazelcast-full-example.xml
hazelcast.yaml complete list of properties: https://github.com/hazelcast/hazelcast/blob/master/hazelcast/src/main/resources/hazelcast-full-example.yaml
@Bean
Defining @Bean for Hazelcast configuration is called Programmatic Configuration.
Example
@Bean
public CacheManager cacheManager() {
  ClientConfig config = new ClientConfig();
  HazelcastInstance client = HazelcastClient.newHazelcastClient(config);
  return new HazelcastCacheManager(client);
}
Starting the Application
To start the application, run the following command: mvn spring-boot:run
You should see in the logs that embedded Hazelcast has started.
Members {size:1, ver:1} [
        Member [172.30.63.9]:5701 - 75cd0b19-ee36-4e0a-9d9c-38c49f67f842 this
]
Testing the Application
You can test the application by executing the following command.
curl locahost:8080/books/12345
Sample Book Name
For the first time, you execute this command it should take some time to get the response. However, when you try it again, it’s instant. That means that the cache is used.
To read more check out the official documentation: https://docs.spring.io/spring-boot/docs/current/reference/html/features.html#features.hazelcast
Hazelcast and Redis Comparison
Hazelcast and Redis at first glance are very similar. They can tackle similar use cases, so it may be hard to decide which to use. Here, we’ll try to describe some of the differences.
We’ll focus on 5 important categories:
- Caching
- Clustering
- Querying
- Streaming
- Compute
Firstly, Redis is a very popular open-source project used widely. If your case is very simple caching and you don’t need clustering, querying & compute then you should stick with Redis. As a simple single instance cache, it’s a great choice.
1. Caching
When we talk about caching, we usually mean we are holding data in memory that comes from a slower store which is usually disk-bound. This could be a Relational Database, Mainframe, NoSQL Database, or any other Application API.
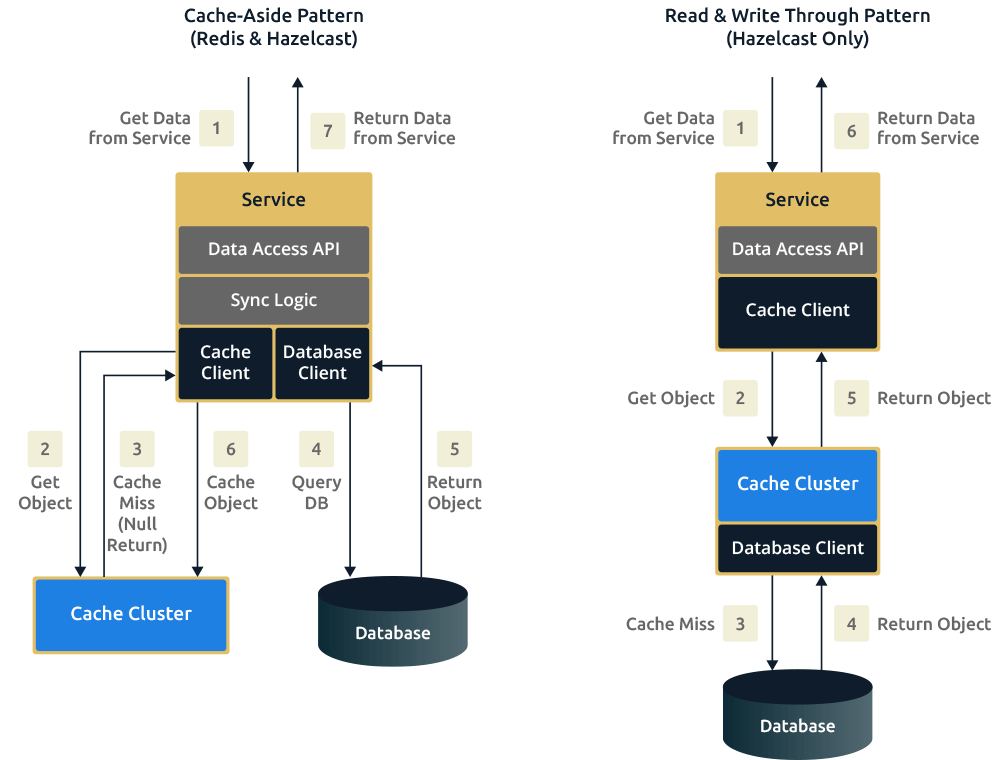
The biggest difference between Hazelcast and Redis for the cache use case is that Redis forces the use of one caching pattern, whilst Hazelcast provides several patterns. Using Redis as a cache over another store like a database forces the use of the cache-aside pattern; this introduces extra network hops. Hazelcast, by comparison, can be configured to handle read-through on a cache miss and write-through on updates. With Redis, the responsibility is on the developer to write the cache/database synchronization logic and also the code to update/read the database. For Hazelcast, only the update/read logic is required, which makes the code base much cleaner and easier to understand. Hazelcast can handle cache-aside if required, but also read-through, write-through, and write-behind caching patterns. Redis only allows for cache-aside.
The diagram below shows the request flow using a cache-aside pattern versus that of read-through and write-through. The important thing to note is that the amount of logic and libraries required in your service to access the cache is greatly reduced with read-through and write-through. The cache process itself handles this logic and the connections to the database with read-through and write-through, whereas cache-aside means your service has to handle this.
Lastly, write-behind is a caching pattern that is available in Hazelcast. We can think of it as an extension of the write-through pattern. Write-behind solves the problem of writing to a slow backing store, for example, an overloaded relational database. With write-behind, the service or application submits the data to the distributed cache and returns an acknowledgment once the data arrives but before it’s committed to the backing store.
2. Clustering
Most clustering operations are handled automatically by Hazelcast. Redis requires manual intervention.
Clustering is a technology that provides scalability and increased space and processing power for data. It is used when one process is not powerful enough or where redundancy is required. The processes in the cluster are often referred to as nodes or members. Redis clustering is used to make use of multiple cores on a machine, this is encouraged because Redis is single-threaded. Hazelcast is multi-threaded, so clustering for Hazelcast is a matter of making use of more memory.
Each Hazelcast member in a cluster takes care of a proportion of primary and replica entries. There is no concept of a master process and backup processes. With Redis, there is the concept of master nodes and backup nodes. Redis clustering provides High Availability and scalability by sharding, it splits larger datasets across multiple nodes. Hazelcast also provides this, except it is called partitioning.
When a node leaves a Redis cluster, manual resharding and recovery are required. Adding and removing nodes in a Redis cluster is also a manual process. All of the above are handled by Hazelcast automatically.
3. Querying
Hazelcast understands complex object graphs and provides querying API, but Redis does not.
Redis and Hazelcast both provide Key/Value structures, but they work quite differently when you want to query. By query we mean the ability to retrieve data when you do not know the key, so you are querying by specific properties of the value.
The most fundamental difference is that Hazelcast can store complex objects and understand the object graph. Redis is unable to do this, to reason about graphs the developer has to model the graph in a series of key/value entries where part of the key represents a property and its value. Redis doesn’t provide the ability to division data using concepts such as tables, everything is stored in one namespace.
On the other hand, Hazelcast provides a Predicate API and SQL like where clauses and projections query out data. These Querying APIs can be used on Complex Objects and JSON. Hazelcast also has a more flexible namespace in that you can have many Maps and name these appropriately, This then negates the need to pollute the key namespace with these concerns, your keys can just describe the actual value being saved.
Finally, Redis doesn’t natively support indexes, instead, the developer has to create their index structures and update these themselves, as well as refer to them.
Hazelcast has native support for indexes. They can be applied via configuration (XML|YAML) or dynamically via the API.
4. Streaming
Redis supports pub-sub messaging to distribute streaming data while Hazelcast comes with a full streaming stack
5. Compute
Redis supports Lua Scripts while Hazelcast allows Java and soon Python and C++
Hazelcast vs Redis Performance Benchmark
To see full Benchmark results go here: https://hazelcast.com/resources/hazelcast-vs-redis/
